 Australian
 Family
 Fast Delivery
 Eco Friendly
- These are the foundational settings you should organize before adding products.
- While you can add products without setting them up first, you'll likely need to go back and update each product once categories, brands, and product options are configure, so it's better to get those set up first
- Choose how your customers will pay.
- Configure secure and convenient payment options, including credit cards, PayPal, Stripe and other gateways.
Cart -> Configuration -> Payment
- Organise your products for easy browsing.
- Create logical categories to help customers navigate your store and find what they’re looking for faster.
- Set delivery expectations and costs.
- Establish shipping zones, methods, and rates to ensure smooth order fulfillment across regions.
Cart -> Configuration -> Shipping
- Control how your products are priced.
- Decide whether your product prices will include or exclude tax, and choose how you want those prices to be displayed to customers.
Cart -> Configuration -> Tax
- Handle product customizations with ease.
- Set up option types like size, color, or material, and create variants that let customers choose what suits them best.
Cart -> Configuration -> Global Options
- Showcase the brands you carry.
- Group your products by brand to boost credibility and make it easier for loyal customers to shop their favorites.
Cart -> Configuration -> Brands
You can now assign specific payment methods to account groups.
This allows you to control how payment options are shown at checkout, for example:
Inside Cart > Payment > Invoice
Set to Account > Once set and saved, it will show in the account groups
This allows you to control how payment options are shown at checkout, for example:
- If a customer is in the INVOICE group, when they reach the checkout no payment is required. Instead, the payment method will automatically display as INVOICE Account.
- If a customer is in the QUOTE ONLY group, no payment is required at checkout. The only available payment method will be QUOTE ONLY.
- For all other customers, the standard payment methods will be available as usual.
Inside Cart > Payment > Invoice
Set to Account > Once set and saved, it will show in the account groups
Before you start adding products, there are a few basics you need to cover: Categories, Product Options, and Brands. Setting these up first will make it much easier to add products without needing to go back and edit them later.
1. Setting Up Product Categories
- Cart -> Configuration -> Category
List Your Main Product Types
- Identify your core product groups (e.g., Furniture, Clothing, Electronics).
- Under each main category, list logical subcategories (e.g., Sofas, Dining Tables, Office Chairs under Furniture).
- Avoid overcomplicating the structure. Limit levels to 2–3 tiers deep so customers don’t get lost.
- If relevant, organize by how the product is used (e.g., Outdoor Lighting vs. Indoor Lighting).
- For example, use Lighting - Indoor and Lighting - Outdoor instead of repeating “Lighting” in multiple places.
- This helps keep your structure clear and less confusing.
- As your catalog grows, revisit your category structure to make sure it still makes sense.
- Cart -> Configuration -> Global Options
Identify Common Product Variations
- Start by listing all the ways your products vary, such as Size, Color, Material, or Finish.
- Group similar attributes under clear option types (e.g., Size with values like S = (Small), M - (Medium), L= (Large), XL = (Extra Large)).
- Use simple, customer-friendly names. Avoid technical terms unless necessary.
- If multiple products use the same set of options (e.g., T-shirts and hoodies both using Size), reuse them to save time and ensure consistency.
- Only include relevant options per product to keep the selection process simple for your customers.
- To avoid confusion, add the parent product or category name (e.g., Colour - Cushions and Colour - Lamps) when using the same option label across different product types.
- Check how options appear on product pages to ensure they’re user-friendly and intuitive to select.
- As your product range evolves, regularly review and refine your options to match customer expectations.
- Cart -> Configuration -> Brands
List All Brands You Carry
- Start by compiling a list of all the brands you offer in your store.
- Always use the official, full name of the brand for clarity and consistency. Avoid abbreviations or variations unless the brand itself uses them.
- If possible, include brand logos alongside their names to enhance recognition and improve the visual appeal of your store.
- Ensure each product is linked to its respective brand to help customers filter by brand easily when browsing.
- Make sure there are no duplicated brands (e.g., "Nike" and "nike") to avoid confusion.
- As you add new brands or discontinue others, make sure to update your store’s brand list to keep it current and accurate.
Now You Can Start Adding Your Products
- With your categories, product options, and brands set up, you’re ready to begin adding products to your store.
- Follow these steps to ensure each product is properly configured and ready for your customers to browse and purchase.
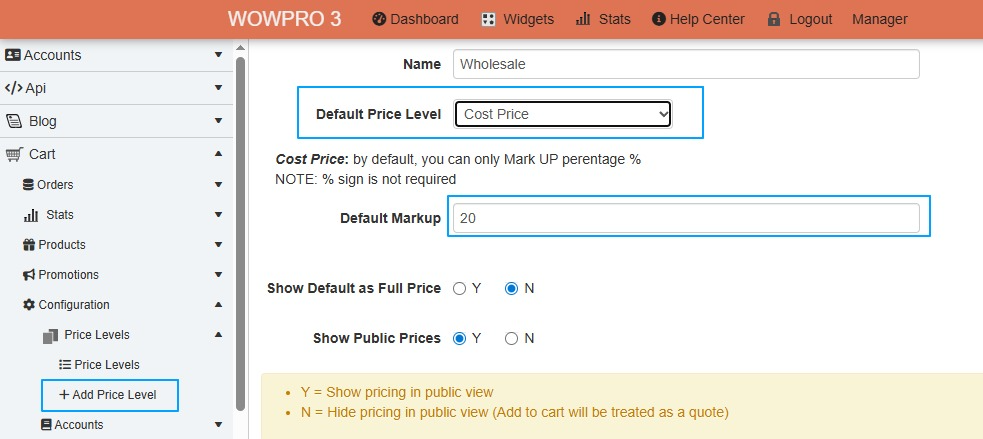
Step 1: Set up a pricing Level for Wholesale clients.
Cart > Configuration > Prices Level
Add a new price level, call it Wholesale
Set the Default Price Level - You have 3 ways of doing this
Step 2: Save and Exit
Step 3: Create a new account type for Wholesalers
Cart > Configuration > Accounts > List Account Groups
Edit the Public Trading group. If there isn't a Wholesale group already there, then add new group.
Group Details:
Cart > Configuration > Prices Level
Add a new price level, call it Wholesale
Set the Default Price Level - You have 3 ways of doing this
- Manual Price list: This is a setup product variant
- Cost Price (Best model to use): Marked up from Cost Pricing
- Public Price: Marked down from public pricing
Step 2: Save and Exit
Step 3: Create a new account type for Wholesalers
Cart > Configuration > Accounts > List Account Groups
Edit the Public Trading group. If there isn't a Wholesale group already there, then add new group.
Group Details:
- Group name = Wholesale Users
- Region = Australia
- Price Level = Wholesale
- Payment Methods = leave blank
- Shipping Methods = leave blank (If you have free shipping set, there is another step to take, so the wholesale client isn't included in the free shipping)
- Min Order Value = Normally, this is set to $200 or higher.